

Writing your own DLL method code gives you greater control over your Aras Innovator instance. This includes providing your users the benefit of being able to run an action without locking up the UI for methods that may take longer to process. Meaning users can stay productive and avoid waiting on tasks such as downloading multiple files.
In our last Conversion Server blog post we went over setting up the Conversion Server and creating a Conversion Server Task programmatically. Now let’s delve a bit deeper to take a look at how conversion server DLL method code is written. More specifically we will be taking a look at the interfaces we can implement to configure our custom tasks. Our example will be focused on the VaultFile Converter interface and configuration of the methods associated.
Configuring the DLL
In order to set up our custom DLL we will first need to get all of our Conversion Server configurations prepared. We will be building upon the code from our last blog post so if you are unfamiliar with these steps give that a quick read. Please note that you will also need to have a subscription to Visual Studio in order to continue on with our example.
Conversion Rule Setup
- Begin by creating a Conversion Type and calling it Part BOM
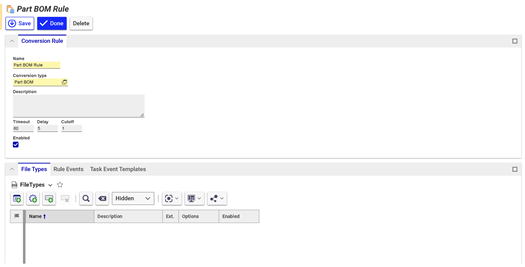
- Next create the Conversion Rule and call it Part BOM Rule setting the Converter Type as Part BOM. Let’s also set up the Cutoff value as 1 so that if we are testing and there are failures the Conversion Server does not run excessively in the background.
- Should look like this:
ConversionServerConfig Setup
- Now we will need to set up the ConversionServerConfig.xml file located in the root of the Aras Innovator installation directory
- Add the Converter name as Part BOM (matching the Converter Type), the type=”PartBOMDLL.PartBOMDLL, PartBOMDLL.” The type is configured with the text before the comma as the name of the C# project namespace and after the period is the class name. Everything after the comma refers to the name of the DLL within the ConversionServer\bin folder into which we copy the DLL.
Adding Converter Type to Conversion Server configurations
- Open the TOC > File Handling > Conversion Servers
- Open default and add relationship Conversion Types with Part BOM selected.
Configuration of our DLL Class
- We can finally get to the fun part, creating our DLL!
- Open up MS Visual Studio (we are using 2019 in our example) and select Create New Project from the menu.
- Search for .NET Framework and select the Class Library (.NET Framework) for C# class library(.dll).
- Give it the Class Library name of PartBOMDLL, then click create.

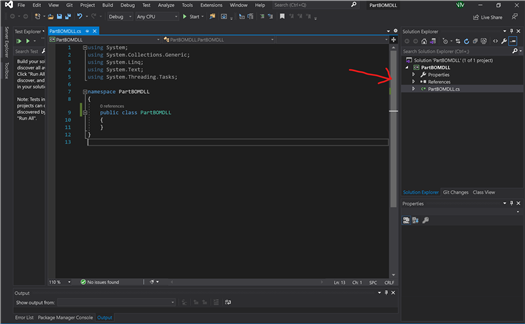
- Now on the right side of your newly created project there will be a Solution Explorer. Right click on Class1.cs and rename this to PartBOMDLL.cs and say yes to renaming the project all the references for Class1.
- This is what it will look like:
- Next, right click on the References and select Add Reference. Click on the Browse section on the left-hand side of the menu.
- Now we will want to reference both the IOM and Conversion.Base dll’s from our ConversionServer\bin folder.
- Open up your machines file directory and go to the directory of your installed Aras Innovator then open ConversionServer\bin. Copy both the IOM and Conversion.Base dll’s from here.
- Now go to the location of your project and paste the selected files to the bin\Debug
- Going back to our open project in VS Studio, click on Browse at the bottom right corner. Now add both dll’s from the bin\Debug folder.
Adding Our Code!
We are all set to add in our method code and get our DLL built now! Let's begin with the DLL logic.
Add in the following snippet and take a look at the commented-out lines to get an understanding of our logic:

Note that as part of the ConversionFramework library we are implementing the VaultFileConverter. This is used in cases where all files that are required for conversion are located within the Aras Innovator vault. This is generally used for files we want to convert to other formats, but also for any case in which we want to add the outputted file to the vault. We can also use IConverter which is used in cases where the code should download the necessary files rather than automatically download from the vault.
In order to set up the client side configurations, code, and method code for the creation of the conversion server task copy over the code from our last blog.
Specifically add the changes for the button on the Part form, the getPartBOM method, and the createPartBOMConversionTask method.
Testing our DLL:
Now we can wrap up and add our custom DLL to Aras Innovator to test:
- Go back and open up VS Studio to our DLL project.
- At the top we will see Build, click on this and select build solution.
- This will create the DLL code and add it to the bin\Debug directory of our project.
- Copy the DLL and go back to the directory of your installed Aras Innovator instance and paste this into the ConversionServer\bin folder.
- Note that whenever rebuilding the DLL from VS studio, we will also need to do the following after:
- Open task manager and end the ConversionService.exe task
- Restart IIS
- Paste the updated DLL to the ConversionServer\bin directory
Let's test out our code!
- Open up any Part and click the new Part BOM Report button.
- Once that completes open up the TOC > File Handling > Files
- Search by FileType:
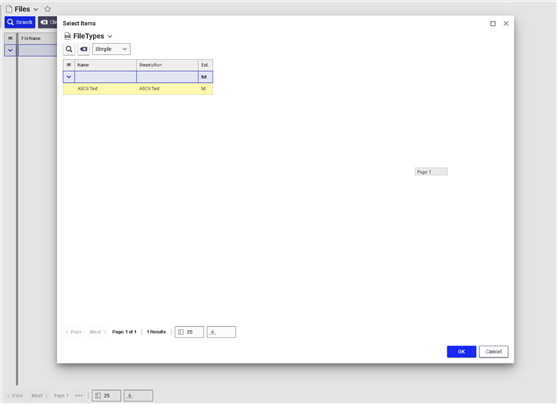
- In the results for the File search grid we will see the partBOM.txt file and its location meaning that it was successfully add to the Vault
Note that we can also check errors with DLL code or failures by going to the TOC > File Handling > Conversion Tasks:
- Search by the custom Conversion Rule and open the last run one
- Go to the Event Handlers relationship and right click
Another way to debug is through setting up debuggers in our DLL code before building it, if operating parameter DebugServerMethod is setup in the InnovatorServerConfig:
Conclusion
Thanks for following along with our series on custom Conversion Server development and utilizing the ConversionServerFramework library. If you are enjoying the series leave a comment below on what you would like to see next!