Do you want to interactively visualize and analyze your data inside of Aras Innovator? In this article, I will review the steps needed to create Microsoft Power BI reports and describe how to embed them into an Aras form.
1. Setting Up Power BI
To get started with Microsoft Power BI, first download Power BI Desktop. The free desktop version provides its users with a convenient way to connect to file, database, Azure, and online service data sources. Using these data sources users can then begin creating reports and quickly familiarize themselves with the Power BI user interface.
Using the Power BI Service, you can publish reports from Power BI Desktop via the web. If you have not yet signed up for Power BI Service, use the Self-service sign up for Power BI page to get up and running with Power BI Service. The page will also review the benefits of signing up for the Pro version of Power BI Service versus using the free version of Power BI Service.
An important benefit to using the pro version is the ability to connect to on premise data. On premise data can easily be accessed using Power BI Desktop and the reports created using on premises data can be published to the web, however, the reports cannot be dynamically refreshed. Using the pro version, a gateway can be installed on the appropriate server and the gateway will be used to permit access to the on premises data source in order to perform any necessary refresh operations. Refer to Power BI Gateway - Personal for further details about setting up an on-premises data source.
2. Create the Client Application
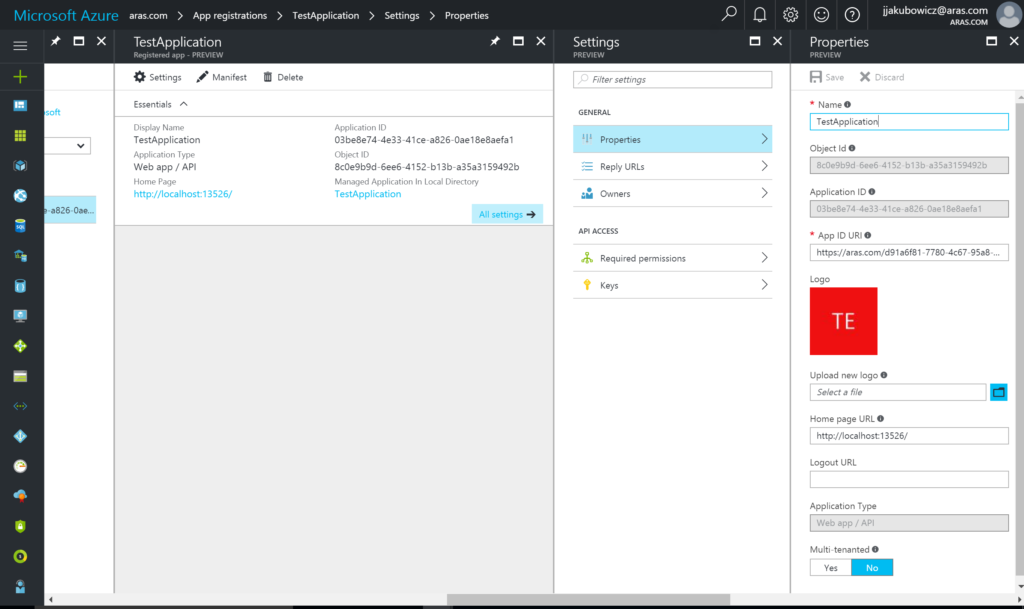
Before getting started in Innovator you must register a client app with Azure Active Directory (AD) using the Power BI App Registration Tool or on the Azure Management Portal. Registering a client application allows you to establish an identity for your Power BI Service and specify permissions to Power BI REST resources.

The Register a Client App page will be helpful in setting up a web app in Azure Active Directory.
3. Getting Essential Libraries
Once you have pushed your reports to Power BI Service or have created your reports in Power BI Service and have registered a client app in Azure Active Directory you are one step closer in embedding Power BI resources into an Innovator form.
Next you will want to use the NuGet Package Manager Console to download the Azure AD Authentication Library. After installing the library, add the Microsoft.IdentityModel.Clients.ActiveDirectory.dll to the \Innovator\Server\bin folder in the Aras Innovator code tree.
Open for Edit \Innovator\Server\Method-Config.xml and add the following lines to referenced assemblies:<name>$(binpath)/Microsoft.IdentityModel.Clients.ActiveDirectory.WindowsForms.dll</name><name>$(binpath)/Newtonsoft.Json.dll</name>.

In the same file, search for the <Template> tag for the language you plan to use and include the Microsoft.IdentityModel.Clients.ActiveDirectory and Newtonsoft.Json namespaces by adding additional using lines. Remember to update the line_number_offset for accurate debugging.

The aforementioned DLLs will be used to obtain content from Power BI Service.
Next, download here the Power BI JavaScript API. Create a Power BI sub folder in the Innovator\Client\Customer folder and add the JavaScript files.
You'll use these JavaScript libraries to embed Power BI resources into an HTML element.
4. Requesting Data From Power BI
In order to access your Power BI resources from Aras Innovator you will need an access token. An access token is used to authenticate your application to Azure AD and thus gain access to your Power BI resources. I suggest starting here and develop an understanding of what it means to authenticate your application.
Once you have a solid understanding on what it means to authenticate your application and have decided on an approach for obtaining an access token create a new server method inside of Innovator.
This method will likely require the Azure AD Authentication Library. You should have already added this DLL to the \Innovator\Server\bin folder in the Aras Innovator code tree and should be all set to reference the library. Below is a code sample demonstrating how to use the library inside of a server method.
Microsoft.IdentityModel.Clients.ActiveDirectory.ClientCredential cc =
new Microsoft.IdentityModel.Clients.ActiveDirectory.ClientCredential(clientId, clientSecret);
Additionally, create another server method to obtain information about the Power BI resource you want to embed. Below is sample code showing how you can get this information by consuming REST services using HTTPWebRequest. This method will call the previous method in order to get the access token necessary to send a GET request and receive a successful response.

5. Embedding the Report in an Aras Form
Next, create a new form and add an HTML field. Below is sample HTML code demonstrating an approach for embedding a Power BI resource into this HTML field.

Now that you have added your report to a form using a HTML field, you will want a place to view this report within Aras Innovator. For the purpose of this tutorial I will review how to view the form on the TOC by adding the form as a view for an item type.
First, in the Categories list item add a new value called Power BI.
Next, create a new item type called Power BI Report and add a TOC Access and TOC View targeting the form you have just created.


You should now be able to select the Power BI Report item in the TOC and view the Power BI Dashboard in Aras.
LOOKING FOR MORE ARAS INSPIRATION?
Stay tuned for Microsoft Power BI Part II: Real-time Dashboards. I'll review the steps to embed dashboards into an Innovator form, including live streaming tiles.
Subscribe to our blog and follow @ArasLabs on Twitter for more helpful content! You can also find our latest open-source projects and sample code on the Aras Labs GitHub page.


