

As you may have read in our recent blog post, Aras Labs is participating in Hacktoberfest 2017! The purpose of this post is to cover how exactly you can go about making contributions to Aras Community Projects.
Introduction
Community Projects are generally helpful customizations that users of Aras Innovator have created and wish to share for other members of the Aras community to use and expand upon. This blog post covers how to make your own contributions to existing Community Projects.
Prerequisites
You will need to install Git onto your local machine. Digital Ocean, the sponsor of Hacktoberfest, has a helpful guide on installing Git that you can find here. However, in this example, we will be using a useful GUI called GitKraken which you can install by following these steps. GitKraken works with or without Git installed.
Additionally, you will also need a GitHub account. If you do not already have one, you can create one though GitHub.
Lastly, you'll want to find a Community Project that you'd like to contribute to. It's easiest to begin working on either fixing or extending the functionality of a project you already use. Alternatively, you can begin working on the open issues filed on GitHub for one of these projects.
Making your contribution
Once you have a project in mind, you can begin by making a local copy of the project that you can begin modifying.
Forking the community project
You should start by navigating to the GitHub URL of the Community Project. For example, let's look at the Kanban Like Task Management project.
https://github.com/ArasLabs/kanban-like-task-management
After navigating to the GitHub URL and logging in, you should click the "Fork" button in the top-right corner of the window.
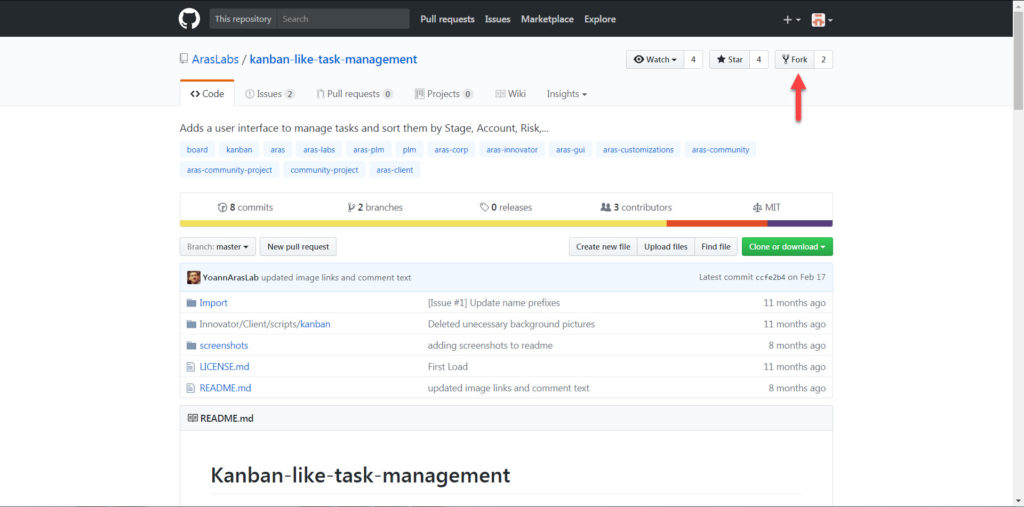
After several seconds, you should be brought to a window that looks much like the repository (or 'repo' for short) except the URL should indicate your username instead of ArasLabs as seen below.
https://github.com/YOUR_USERNAME/kanban-like-task-management
Cloning your forked project
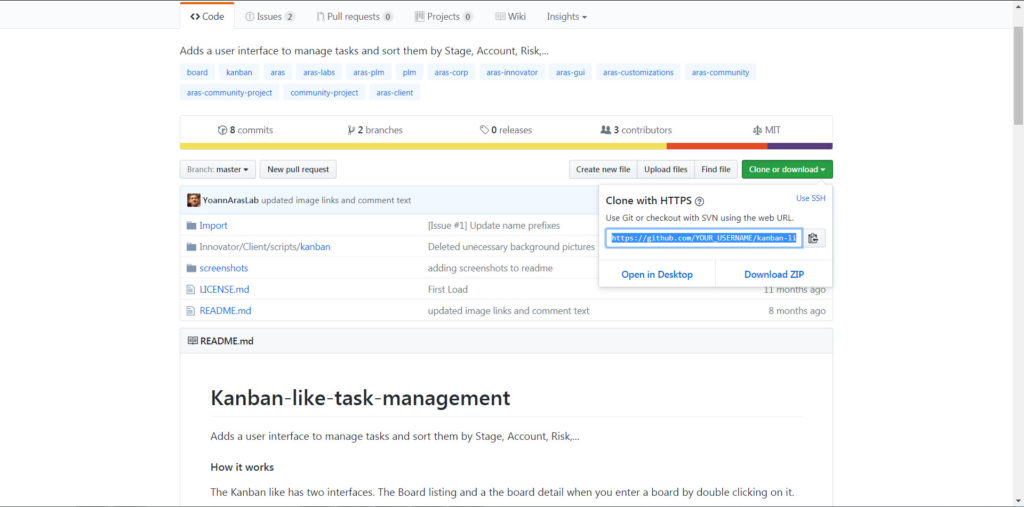
After forking your copy of the Community Project, you will now want to clone it to your local machine, so you can begin working on it. You can do this by first clicking the green "Clone or download" button in your repository and copying the URL.
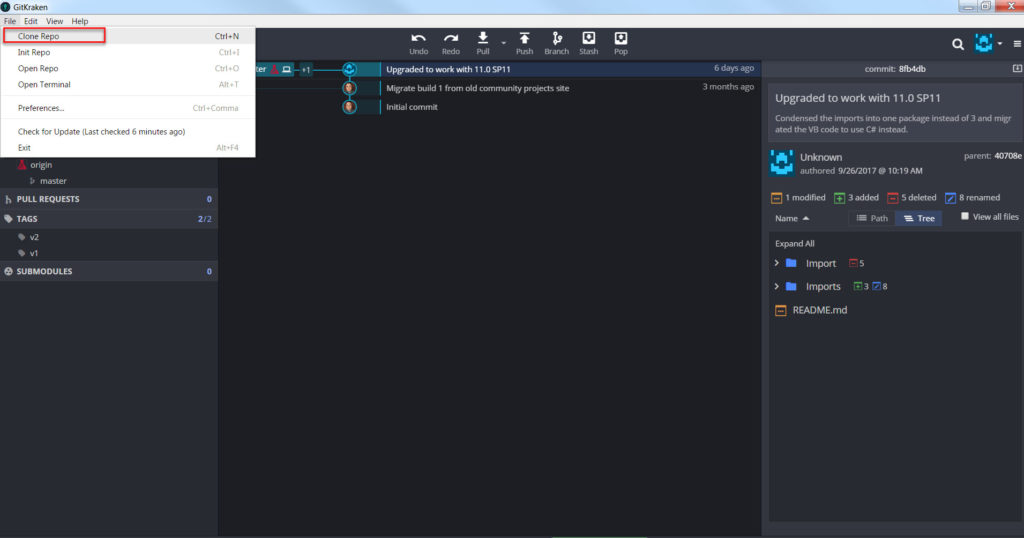
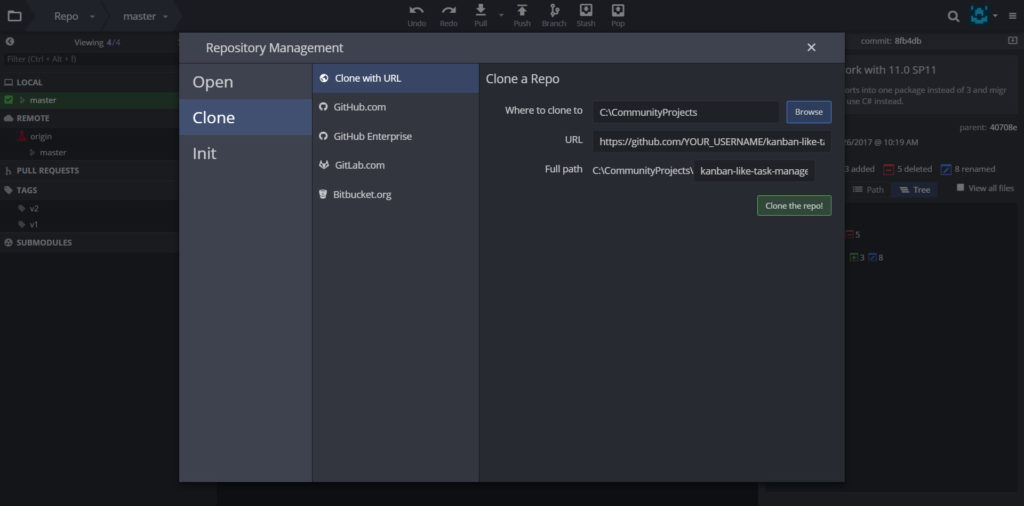
Once you have copied this URL, you can open up GitKraken. After it loads, open the File Menu in the top-left corner and select Clone Repo.
This should bring up a menu similar to the one below. Choose the "Clone with URL" option and paste the URL of your forked repository into the URL field. Specify the directory you want to store this project in and click "Clone the Repo!"
After a few seconds, the repo should now be successfully cloned to your system. GitKraken will then prompt you to open the repo you just cloned. You should open this repo before continuing.
Creating a new branch
When you first clone the Community Project, the master branch will be the active branch. Any changes you make to your local folder of this community project will be saved to the active branch. Typically, you can think of the master branch as being the version of the project that users will download. Because there may be several different iterations of your customizations, it is a best practice to first create a new branch to make and store your changes into.
In GitKraken, you can check what the active branch is by looking for a green checkmark next to the branch name.
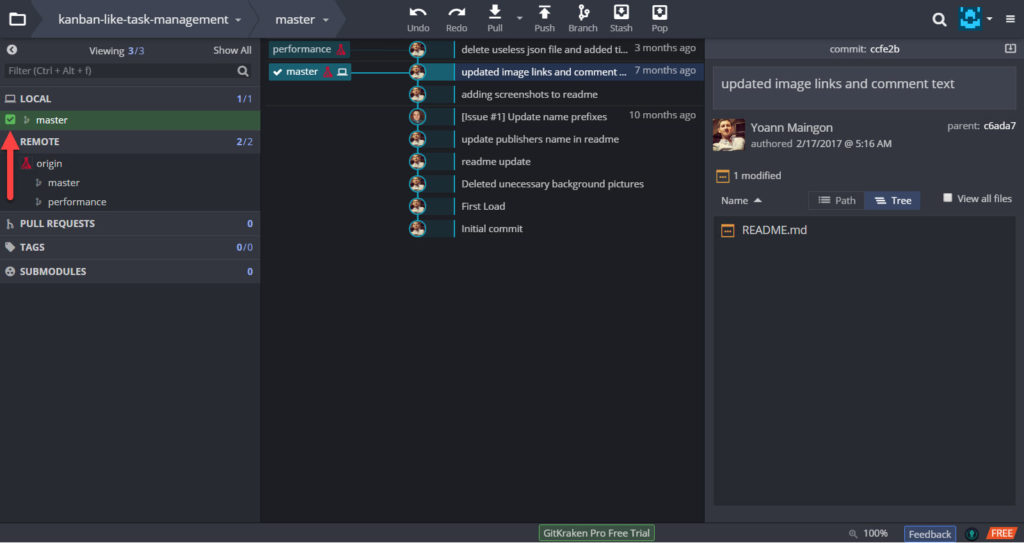
In the example above, you can see that the master branch is the active branch. You can create a new branch by right-clicking on this and selecting "Create branch here".
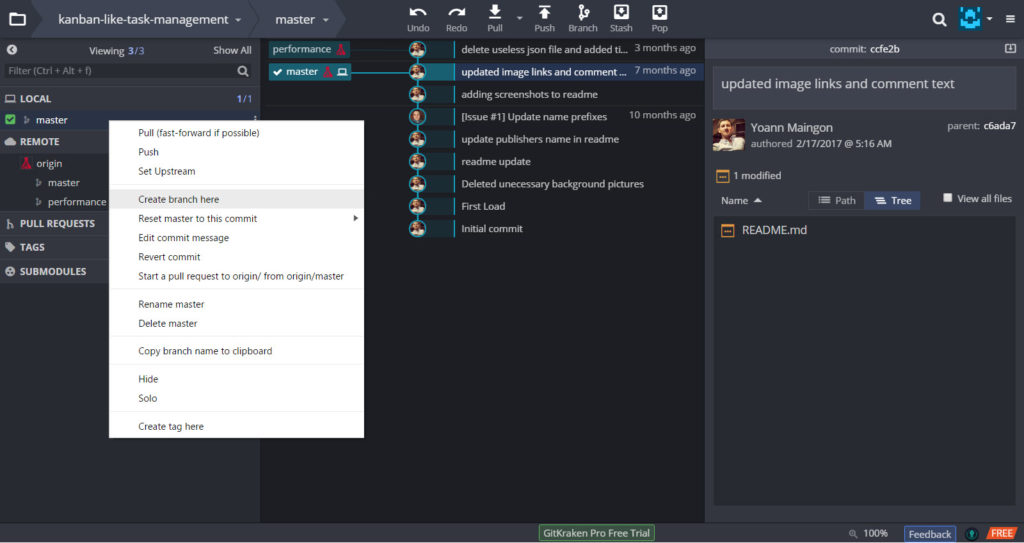
You will then be prompted to enter a name for this branch. When choosing a name for your new branch, it is best to pick something descriptive to the feature or bug that you are working on. For example, a possible branch name for this Kanban project could be "move-cards-between-boards".
After choosing a name, your new branch should automatically become the active branch.
Make changes to your local repo
After you have made your modifications, you will need to commit your changes to your local copy of the repository. GitKraken automatically keeps track of any additions, deletions, or modifications to files in your local repository. You can see these changes in the commit panel on the right side of the window.
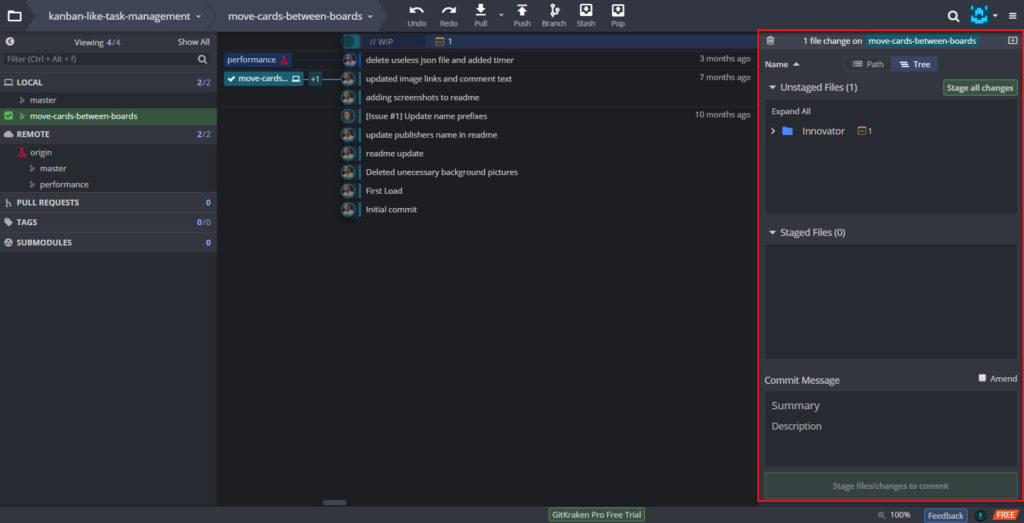
The commit panel is broken down into three different sections.
- Unstaged Files: Files that will not be included in the commit
- Staged Files: Files that will be included in the commit
- Commit Message: A brief summary of the modifications you have made and the reasons you made them
It is possible to include files en masse by clicking the green "Stage all files" button or individually by selecting a file and clicking the "Stage file" button.

Once you have staged your changes and written a Commit Message outlining your changes, you can click the "Commit changes to n file(s)" button at the bottom of the commit panel to save these changes to your local directory.
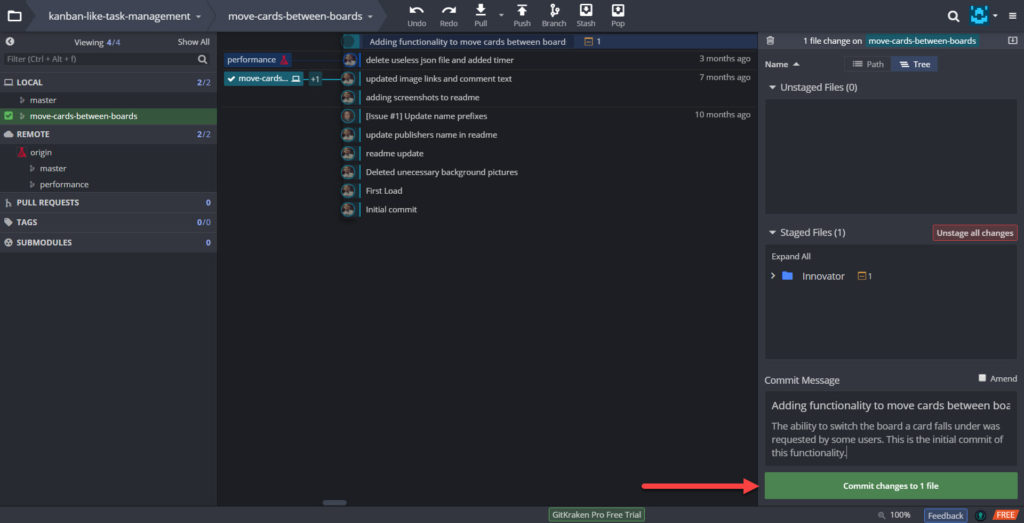
Lastly, you can save these changes to your repository on GitHub by clicking the push button at the top of the screen.
![]()
Syncing your changes
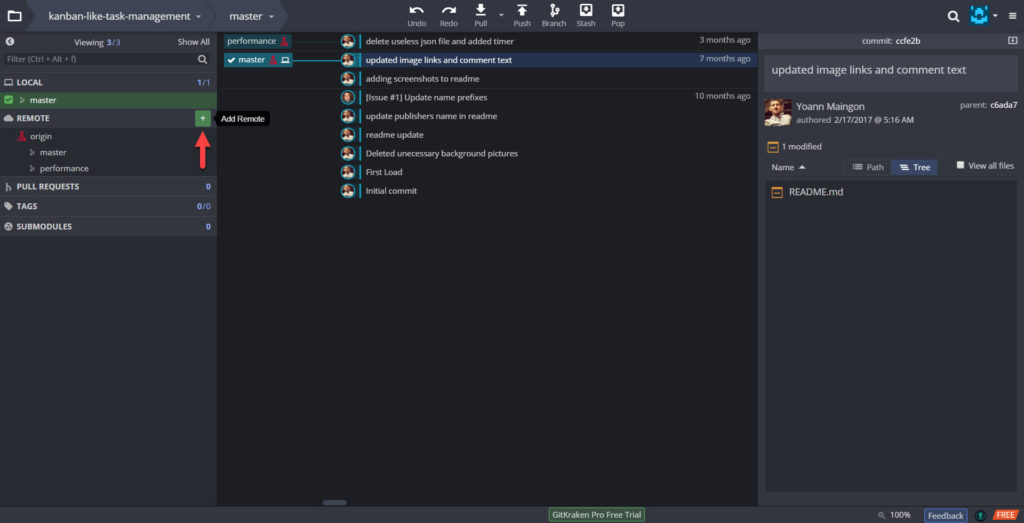
Because many contributors can be working on a Community Project at one time, the original repository may have been updated while you were making your changes. In order to make sure that the changes you made will not overwrite someone else's, you should sync your new branch with the most recent version of the original repo.
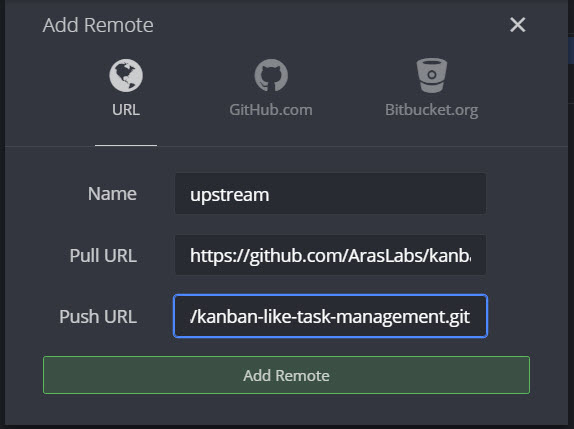
To do this, first copy the clone URL of the original Community Project on GitHub. Once you have the URL, you can create a new remote repository from GitKraken by clicking the green '+' sign in the REMOTE section of the window
Give this a suitable name and paste the clone URL into both the Pull URL and Push URL fields.
Once you have an up-to-date remote of the main repository, click and drag the master branch from this new remote repository onto your active branch in order to merge the two.
GitKraken will inform you if there are any merge conflicts, instances where the same line in two branches has been edited in two different ways. GitKraken offers a useful merge conflict tool to help you resolve these conflicts if there are any.
If you have any conflicts, resolve them, commit the changes, and push them to your GitHub repository.
Submitting a pull request
With your customizations completed and merged, you can navigate back to your forked repository on GitHub. You should then click the "New pull request" button on the left of the window. In the next window, you can select the repository of the original Community Project and the branch you want to merge your changes into (typically master).
In the resulting window, you should see that the two branches are able to be merged. You will also be prompted to write a title and summary of your pull request so the project maintainer will know what intended purpose of the request is.
Conclusion
After that, you're all finished! The project maintainer will evaluate and test your pull request. If it all looks good, your changes will be merged in for other users to benefit from, and a note of your contribution will be added to the project.
If you have any additional questions about submitting a pull request, contributing to an existing Community Project, or creating your own Project, tweet us at @ArasLabs or send us an email at [email protected].