

Aras Innovator is always improving and being updated frequently with Service Packs and Update Packages. Today, we’re going to go over a couple of new features for the Technical Document Framework (TDF) that were recently introduced in Version 12, Service Pack 10. TDF is available to all Aras users, and can be downloaded and installed using the Aras Update Utility. The additions we’re discussing today let you do what you could already do, but faster and easier. Let’s get started.
Changing Referenced Items
Your business needs are always changing, and your documentation needs to change to reflect what’s going on in your organization. Alternately, sometimes you’re on the last reread of a document before you realize you made a basic mis-click two hours (or two days) ago that has gone unnoticed. However it happened, imagine you meant to reference part MP0101 but your document is using part MP0102. Not to worry, we can change that.
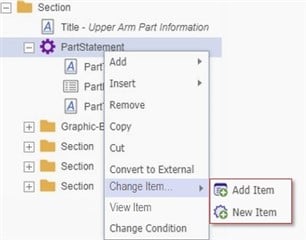
- Right click the part in the breakdown on the left.
- From the resulting context menu, mouse over Change Item.
- From here, you have two options.
- Click Add Item to choose an existing item to swap into place.
- Click New Item to create a new item to swap into place.
- Either way, Mapped Document Elements that are related (for example, the displayed name) will be automatically updated.
This is a handy little option to keep in mind, because while it’s so simple as to be seemingly unimpressive in a test document, this can be a major time saver in a large and thoroughly integrated piece of technical documentation. Changing the reference can be two or three clicks away, and Aras Innovator takes care of the rest.
Importing Images
They say a picture is worth a thousand words. In TDF-Enabled documents, images can communicate in ways that description struggles with, from a simple circle highlighting part of a UI to a diagram or schematic. Now, you can insert a picture into a technical document quickly and easily.
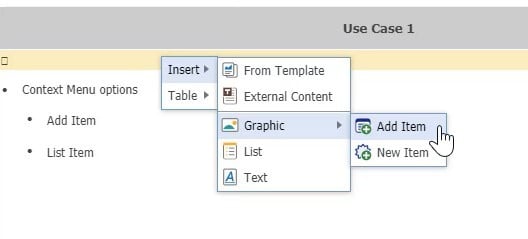
- In the editor, right click to open the context menu.
- Mouse over Insert.
- Mouse over Graphic.
- Left click on New Item. This will open a file selection dialogue.
- In the file selection dialogue, browse along your folders to find the image you want.
- Open it in the file selection screen.
- After a moment of loading, you’ll see the New Graphic dialogue appear.
- You can edit the name of the file
- You’ll need to enter a Graphic Number.
- Click OK. [todo: OK icon]
- The image should be displayed in the editor!
It’s important to realize that you haven’t just put the image here- you’ve also added the image as a Graphic. You’ll be able to reuse it elsewhere, and it gets stored much like other files. It’s the same as doing things the old way once all is said and done, but this gets you there a little easier.

Conclusions and Congratulations
Now you’ve got two new techniques to use the next time you’re editing a technical document in Aras Innovator Version 12 SP10 and above. There are many small details that can make Aras Innovator even easier to use, and the longer you and your organization use Aras and the more you learn about how to make the most of it the better you get at improving your process. In the end, that’s what we’re here for- to make you better at what you do. Let us know below what your favorite little shortcut is in Aras Innovator!